

Congratulations on purchasing a help desk software for your customer service team! This powerful tool will help your team collaborate on support tickets, automate repetitive tasks, and resolve issues more efficiently.
You might think that setting up a help desk is a daunting task requiring hours of work and a large team. However, that’s not the case. You don’t need to be a tech expert to set up a help desk. Most service desk software solutions are designed with user-friendly interfaces to make the process smooth and straightforward. In this blog post, we will guide you through the steps to set up your helpdesk effectively.
How to set up a help desk: A comprehensive checklist
Setting up a help desk involves several key steps to ensure smooth operations and efficient customer support. Here’s a comprehensive checklist to guide you through the process:
1. Set clear goals for the help desk setup process
The primary objective of help desk software is to enhance customer service, but this goal can be broken down into more specific targets tailored to your business needs. Whether you are implementing a new helpdesk software or optimizing an existing setup, establishing clear goals is crucial.
These goals could include keeping customer interactions organized, improving team collaboration, and notifying customers promptly. When goals are clearly defined, it ensures that all team members are aligned and understand what is expected, leading to a more efficient and cohesive setup process.
Recommended Reading: Zendesk vs Zoho Desk: Which one is Best for your Business in 2025
2. Select your communication channels
For businesses that provide support through omnichannel such as email, web forms, web widgets, and support portals, a help desk can streamline the management of inquiries from these various sources into one unified inbox. Additionally, it allows you to create a self-service knowledge base, which can help reduce the number of support tickets by enabling customers to find answers to common issues on their own, hence improving the customer experience.
3. Define key performance indicators (KPIs)
Tracking every help desk metric can be overwhelming and may divert attention from what truly matters. It’s essential to determine which KPIs are most relevant to your goals and your customers’ needs. While KPIs are useful indicators, achieving the numbers doesn’t necessarily mean customer satisfaction is guaranteed.
Focus on a few critical KPIs such as Average First Response Time, First Contact Resolution, and Customer Satisfaction Score to monitor and analyze your help desk’s performance effectively.
4. Define user roles
Help desk systems allow you to assign custom roles to users, such as admins, managers, and agents. Before setting up the ticketing system, have a clear understanding of the roles and responsibilities each team member will have. This ensures that appropriate permissions are granted, enabling each user to perform their tasks efficiently.
5. Simplify customer interactions
Customers don’t need to be aware of the internal workings of your help desk system. They should have a seamless experience, ideally interacting with a single point of contact. When drafting communications, use a personal tone and avoid including technical details like ticket numbers or customer IDs. This approach makes the interaction more personal and less bureaucratic.
Recommended Reading: 8 Easy Ways to Deliver Personalized Customer Service
6. Minimize friction for support teams
Every additional task or process can draw away from the time your support team has to assist customers. Ensure that your help desk and its processes are organized to save your support agents time and energy. This might involve streamlining workflows, reducing unnecessary steps, and ensuring that the system is intuitive and user-friendly.
7. Eliminate duplicate work
If your support team frequently performs repetitive tasks, it’s a sign that your processes need improvement. Look for opportunities to automate ticket handling, incorporate pre-written responses, prioritize tasks, and implement other solutions to address common issues efficiently. Reducing duplicate work frees up your team to focus on more complex and unique customer problems.
8. Plan your reporting strategy
When setting up your help desk, clearly define what metrics you want to measure and what information you need to capture. By establishing a reporting strategy from the outset, you can ensure that your help desk collects the necessary data to provide insights into performance and areas for improvement.
Having a well-outlined reporting framework helps in making informed decisions and continually enhancing your customer service operations.
By following this detailed checklist outlining the help desk best practices, you can set up a help desk that is well-organized, efficient, and tailored to meet the specific needs of your business and customers. This structured approach ensures that your help desk not only functions smoothly but also contributes to higher levels of customer satisfaction.
Recommended Reading: Understanding the Difference between Help Desk vs Service Desk
How to set up a help desk in 5 simple steps?
Setting up a help desk is crucial for providing efficient customer support and maintaining user satisfaction. By following these five simple steps, you can establish a structured and effective help desk system. From setting up your inbox to building insightful reports, each step plays a vital role in ensuring your help desk operates smoothly and meets the needs of your organization and its customers. Let’s walk you through the steps, helping you build a solid foundation for delivering exceptional support services.
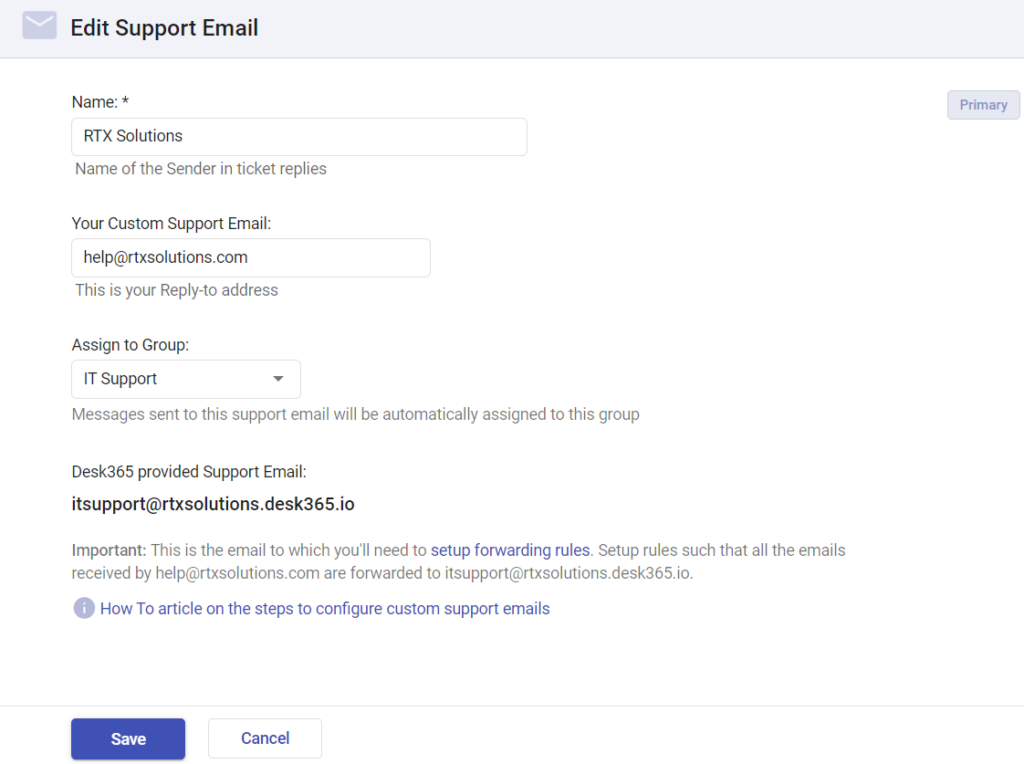
Step 1: Set up your inbox
One of the key advantages of help desk solutions is the ability to consolidate all customer tickets into a single platform. This unified approach ensures that managing customer communications is streamlined and no important tickets are overlooked.
Help desk inboxes allow you to integrate all customer-facing team emails, such as support@yourcompany.com, marketing@yourcompany.com, and sales@yourcompany.com, into one central location.
To configure a custom support email, follow these steps:
- Navigate to Settings.
- Go to Channels.
- Select Email.
- Define and set up your custom support email address.
By doing this, you ensure that all customer inquiries are directed to your help desk, making it easier to manage your inboxes and respond to tickets promptly.
Step 2: Add help desk agents
With your inbox configured, the next step is to add agents to your help desk team. Agents are the users responsible for handling and resolving support tickets.
To add an agent, follow these steps:
- Navigate to Settings.
- Select Admin.
- Go to Agents.
- Click on the Add Agent button.
You will then be prompted to:
- Enter the agent’s name.
- Assign them a role (e.g., Admin, Agent, Manager).
- Add agents to the relevant group based on their responsibilities and expertise.

Adding agents effectively distributes the workload and ensures that customer inquiries are handled by the right personnel.
Step 3: Create canned responses
Canned responses are pre-written templates that enable support agents to quickly and efficiently respond to frequently asked questions and common issues. This feature in help desk software allows agents to draft and save responses once and reuse them whenever similar inquiries are received, significantly reducing response time and ensuring consistency in communication.
To create a canned response, follow these steps:
- Navigate to Settings.
- Select Productivity.
- Click on Canned Responses.
- Click on the Add Canned Response button.
Once you are in the canned response creation interface, you will need to:
- Enter a title: Provide a clear and descriptive title for the canned response. This helps agents easily identify the appropriate response when needed.
- Draft the message: Write the content of the response. Make sure the message is clear, concise, and addresses the common query effectively.
- Add placeholders: Use placeholders to personalize the response. For example, you can include placeholders for the customer’s name or ticket number, which will be automatically populated when the response is used.
- Attach files: If necessary, you can attach relevant files or documents that may help resolve the customer’s query.
- Configure visibility: Determine the visibility of the canned response. You can set it to be visible to all agents or restrict it to specific teams or departments.
Agents can create as many canned responses as needed to cover a wide range of common questions and issues. This feature not only improves efficiency but also ensures that customers receive timely and consistent information.
Recommended Reading: 12 Best Canned Response Templates for Customer Support Emails
Step 4: Set up automations for customer surveys
Capturing customer feedback immediately after a ticket is resolved or closed is crucial for understanding and improving customer satisfaction. With the best help desk ticketing system, you can automate the process of sending customer surveys to gather this valuable feedback.
To set up an automated survey, follow these steps:
- Navigate to Settings.
- Select Admin.
- Click on Surveys.
Once you are in the survey setup interface, you will need to:
- Name your survey: Provide a clear and descriptive name for your survey. This helps you and your team easily identify the purpose of the survey.
- Enter the survey question: Write the question you want to ask your customers. This question should be designed to gather meaningful feedback about their experience.
- Choose the survey type: Decide on the format of your survey. You can choose from several types, including:
- Customer satisfaction survey (CSAT): The CSAT survey typically asks customers to rate their satisfaction with the service they receive.
- Five-star rating: Customers rate their experience on a scale of one to five stars.
- Net promoter score (NPS): The NPS survey measures customer loyalty by asking how likely they are to recommend your service to others on a scale of 0 to 10.
By automating customer surveys, you ensure that feedback is consistently gathered without requiring manual intervention from your team. This not only saves time but also helps you quickly identify areas for improvement and maintain high levels of customer satisfaction.
Step 5: Build insightful reports
A help desk is truly effective only if its performance can be accurately measured and evaluated. The reporting and analytics feature in a help desk system allows you to assess key metrics and measure the overall performance of your support agents and teams.
To create and analyze reports, navigate to Reports and choose the Report Type that best suits your needs. Help desk systems typically offer a variety of report types, including ticket volume, response times, resolution times, and customer satisfaction scores.
Customize your report by selecting the specific metrics you want to analyze, such as ticket volume, response times, resolution times, and customer satisfaction scores. Once you’ve generated the report, review the data to identify trends, areas for improvement, and high-performing agents and teams. Share these insights with your help desk employees to make informed decisions, set goals, and implement strategies for enhancing your help desk operations. By building and regularly reviewing insightful reports, you can continuously monitor and improve the performance of your help desk, ensuring that your customer service remains efficient and effective.
Finally, test your help desk setup
To ensure your help desk is fully operational and provides the best service experience, it’s crucial to thoroughly test the setup. Start by creating a sample customer email account and generate a few test tickets. Involve your colleagues in addressing these tickets and evaluate all the critical features discussed in this blog.
First, verify that support agents receive Teams or Email notifications when a ticket is created or updated. This ensures that no ticket goes unnoticed. Next, check if you can assign tickets to the right team member i.e., a specific agent or group, ensuring the right people handle the right issues.
Additionally, test whether the required agents and contacts have access to the internal knowledge base and confirm they can add attachments. This will help ensure that they can provide comprehensive and informed responses to customers.
Finally, explore the report section to see if you can gain insights into key metrics such as response times and ticket resolution rates. These insights are crucial for monitoring performance, identifying areas for improvement, and improving your customer service.
Once you’ve tested all the features and help desk tools and confirmed they perform as expected, your help desk setup is ready to deliver excellent customer support. By following these steps, you can configure your help desk for optimal performance.
Simplify help desk setup with Desk365
Choose Desk365 as your customer service partner today and experience faster and more efficient ticket resolution. With one comprehensive plan and transparent pricing, you can start your 21-day free trial today or request a demo to see how Desk365 can enhance your customer service operations.
Frequently asked questions
No, modern help desk software like Desk365 is designed to be intuitive, requiring no advanced technical skills for setup.
Yes, Desk365 allows seamless integration of email, web forms, web widgets, Microsoft Teams, and support portals into a unified inbox.
Automation streamlines repetitive tasks such as ticket assignment and survey follow-ups, freeing your team to focus on complex issues.
Yes, Desk365 provides robust reporting and analytics tools to measure KPIs like response time, resolution rates, and customer satisfaction.