When looking for a simple, budget-friendly solution to manage tasks or support requests, several options are available, such as SharePoint, Google Forms, Asana, and Excel. Each tool offers unique features and caters to different needs, but every software or product comes with its own set of imperfections. Even with top-notch tools, users may encounter confusion, bugs, or limitations that could affect their experience.
This is where the IT helpdesk or support team plays a crucial role. They work diligently to process customer issues submitted as tickets, channel these tickets to the appropriate departments for resolution, and keep customers updated on the status of their problems whenever possible. A well-functioning IT support team can make all the difference in ensuring that issues are addressed efficiently and effectively.
To perform these tasks effectively, IT helpdesks need dependable tools. One of the most widely used solutions is a ticketing system. A robust ticketing system to manage, organize, and help manage, organize, and resolve customer concerns in a streamlined way. With the right ticketing system in place, support teams can accelerate the resolution process, keep track of ongoing issues, and ensure that customers receive timely updates on their requests.
In this article, we’ll explore the fundamentals of a popular ticketing system called Jira. By the end, you’ll have a clear understanding of what Jira is, how it operates, and why it’s a valuable tool for managing customer issues and streamlining IT support processes.
How Jira works?
Jira system is based on the concept of issues, which can represent anything from a software bug to a project task or a service request. Each issue is tracked from creation to completion through statuses that represent its lifecycle stages, which can be fully customized to fit the team’s workflow. For instance, an issue might go from ‘To Do’, to ‘In Progress’, to ‘QA’, and finally to ‘Done’.
Users can create detailed tasks within Jira, assign them to team members, set deadlines, and prioritize work within the system. Each task can include a variety of fields such as descriptions, comments, attachments, and custom fields tailored to the team’s needs. This allows for robust, detailed information gathering and sharing within a team or across departments.
Jira is particularly known for its powerful integration capabilities. It integrates seamlessly with many tools that software teams might already be using, like code repositories, continuous integration tools, and build servers, enhancing its functionality and streamlining the development process.
This ecosystem allows for automation in several areas, such as triggering builds when an issue is updated or sending notifications through different channels when certain events occur in Jira.
Another key feature is the reporting and dashboard capabilities, which provide teams with insights into their workflows, project progress, and individual performance. These tools help managers and team members gauge productivity and pinpoint bottlenecks or issues in real time.
What is a Jira ticket?
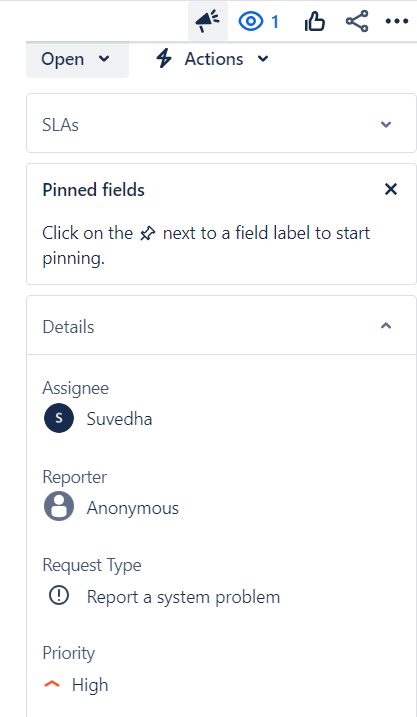
A Jira ticket, often referred to simply as a “ticket” or an “issue,” is a unit of work within the Jira software that represents a task, bug, user story, or any other type of project work that needs to be tracked and managed. Each Jira ticket is a detailed record containing all the information necessary to complete the task or resolve the issue at hand.
Here’s how a Jira ticket typically functions:
- Identification: Every ticket is assigned a unique identifier (like PROJ-123) which helps in tracking and referring to the ticket in discussions and documentation.
- Description and details: The ticket includes a title and a detailed description outlining what needs to be done or what the problem is. It can also contain other relevant data such as screenshots, error logs, or other attachments that provide further context.
- Workflow: Jira tickets are subject to a predefined workflow, which might vary depending on the team’s processes. Common stages in the workflow include statuses like To Do, In Progress, In Review, and Done. These statuses help teams understand the stage of each task.
- Assignee and reporter: Tickets are assigned to team members who are responsible for working on them. They also have a reporter, usually the person who created the ticket, who might differ from the assignee.
- Prioritization: Tickets can be prioritized to indicate urgency and importance. This helps teams tackle the most critical tasks first.
- Comments and collaboration: Team members can comment on tickets, facilitating discussion and collaboration directly within the work item context.
- Tracking and reporting: The progress and history of each ticket are tracked meticulously. This includes changes to the status, updates to the description, comments, and changes in assignment. This historical data is crucial for reporting and analytics, helping teams improve their workflows and project management practices.
In essence, a Jira ticket is a comprehensive tool for managing and executing work methodically, ensuring that nothing falls through the cracks in complex project environments. It is a central piece in the coordination of tasks, communication among team members, and the overall management of project timelines and deliverables.
How to use Jira as a ticketing tool?
Here’s how you can leverage Jira to manage, organize, and resolve customer issues efficiently.
1. Create a Jira Service Management account
To get started, you’ll need to sign up for a Jira Service Management account (previously known as Jira Service Desk). Review the different pricing plans available to find the one that best suits your organization’s needs. Once you’ve completed the registration process, you can log in to the Jira Service Management portal to begin setting up your ticketing system.
2. Create a new project
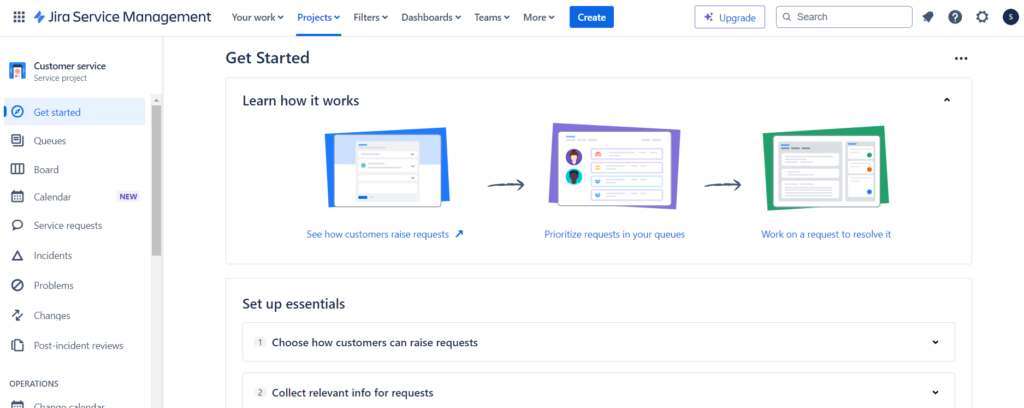
After logging into Jira Service Management, the next step is to set up a new project that will serve as your ticketing system.
To do this, click on the “Create” button and select “Project.” Jira offers several templates designed for service management, each with specific features tailored to different use cases. For example, the IT Service Management template is specifically designed for IT service management and includes features like incident management, problem management, and change management.
The Service Desk Project template is a more general service management option suitable for any type of service management, including IT, HR, and customer service; it offers features such as incident management, problem management, and request management
If your organization uses agile methodologies, the Scrum and Agile Project template provides features like sprint planning, backlog management, and burndown charts.
There’s also the Project and Portfolio template, intended for organizations that need to manage multiple projects and portfolios, which includes features like resource management, project timelines, and portfolio performance metrics.
Depending on your organization’s specific needs and service management processes, Jira can be customized accordingly. Team members have the option to create custom templates or combine existing Jira templates to ensure they are using the best configuration for their particular requirements.
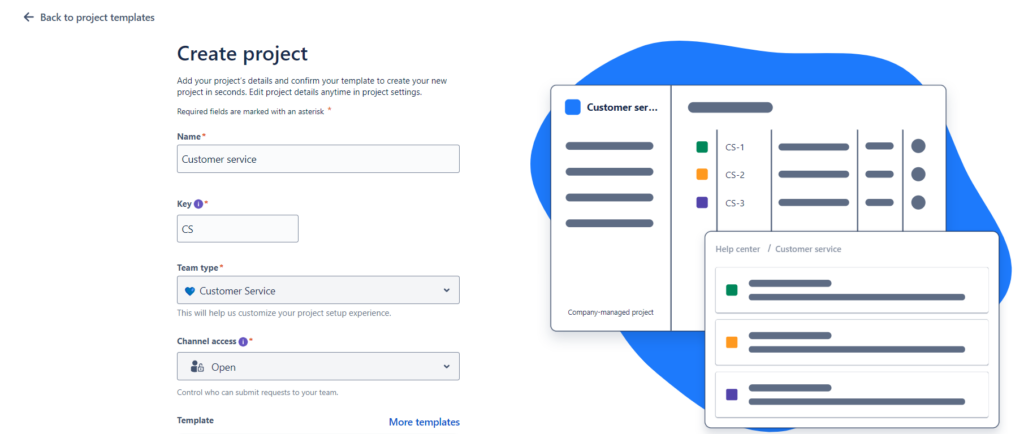
For setting up your ticketing system, it’s recommended to select the “IT Service Management“ template. After choosing the template, add a project name, assign a key, specify the team type, and then click on “Create project” to finalize the setup.
Customize your project settings
After creating your project, you can tailor its settings to meet your organization’s specific needs. This includes defining custom issue types—such as “Request” or “Incident”—and configuring the statuses that tickets can have, like “Open,” “In Progress,” and “Closed.”
You can also set up custom fields and forms to collect specific information from customers. Beyond issue types and statuses, other key customization options available in the IT management desk include Queues and Channels, Service Level Agreements (SLAs), Prioritization, Automation, and Customer Portals.
Create queues and channels
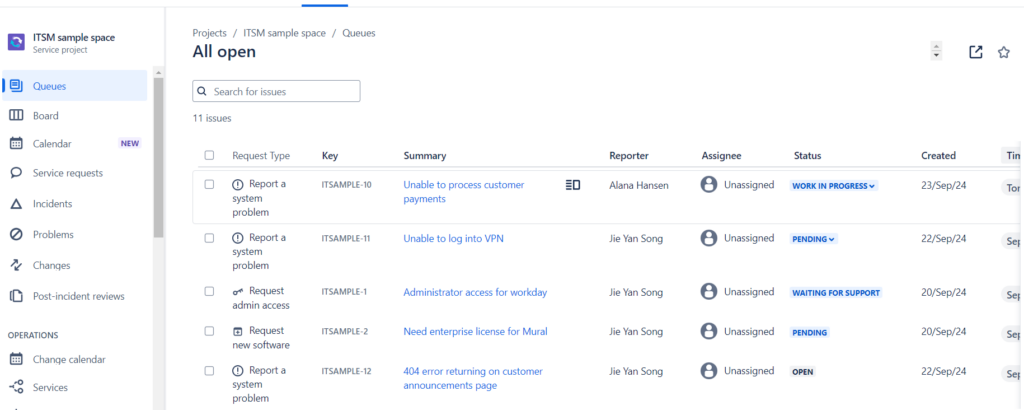
One of the key features of Jira Service Desk is the ability to create queues and channels for managing different types of tickets. For example, you can set up one queue for customer requests and another for technical issues.
To create a new queue or channel, go to your project settings and select “Queues” or “Channels” from the left sidebar. Click the “Add” button to initiate the creation process. Fill in the necessary information, such as the name, description, and routing rules for the queue or channel. Once you’ve entered all the details, click “Save” to finalize it.
Additionally, you can establish support channels in your project for clients to submit requests, such as a customer portal or a linked email account. On the portal setup page, you can specify which areas of the website clients can access. This helps ensure that tickets are properly categorized and routed to the appropriate team members for handling.
Recommended Reading: The Ultimate Guide to Ticket Queue Management
Set up email notifications
To ensure that tickets are handled promptly, it’s important to set up email notifications. Jira Service Desk allows you to configure notifications for various events, such as when a ticket is created, a comment is added, or a ticket is resolved. This ensures that team members are aware of new activities and can respond in a timely manner.
To set up email notifications:
- Navigate to your project settings and select “Notifications” from the left sidebar.
- Choose the notification scheme you want to use, or create a new one based on your preferences.
- Select the events you want to receive notifications for.
- Click “Save” to update the notification scheme.
By configuring email notifications, you help your team stay informed and ensure that tickets are addressed efficiently.
Create reports and dashboards
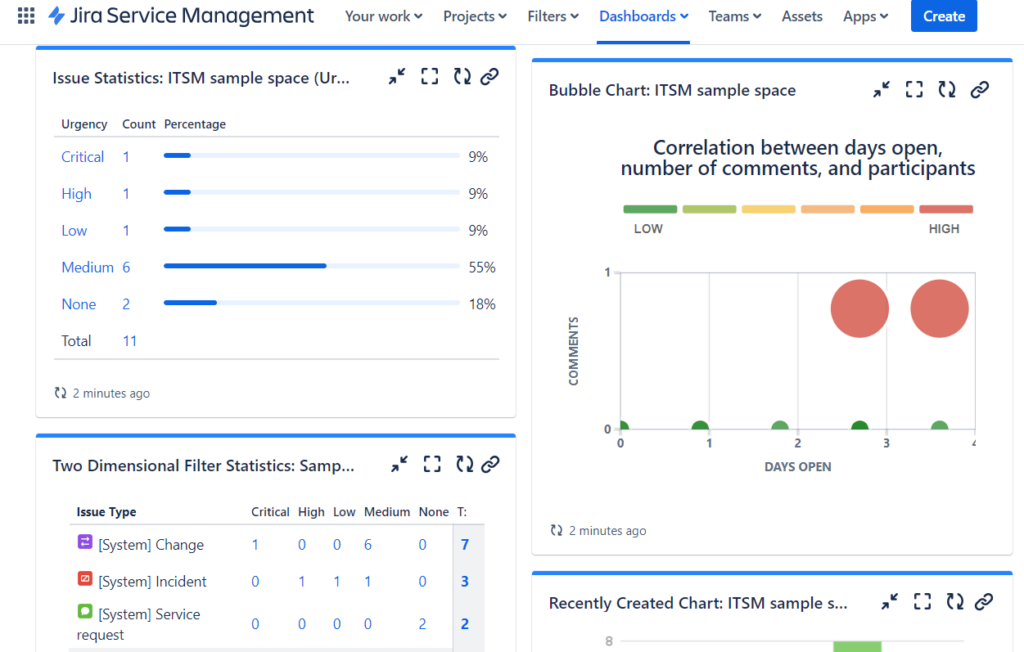
To monitor the performance of your ticketing system, it’s important to create reports and dashboards. Jira Service Desk allows you to generate various reports, such as ticket volume, resolution time, and customer satisfaction. By tracking these metrics, you can make data-driven decisions to improve the system’s performance.
To create a report:
- Navigate to your project settings and select “Reports” from the left sidebar.
- Click the “Create” button.
- Choose the type of report you want to create, such as a pie chart or a bar chart.
- Enter the necessary details for the report.
- Click “Save” to generate the report.
To create a dashboard:
- Go to “Dashboards” in the left sidebar.
- Click the “Create” button.
- Provide a name for your dashboard and choose the desired layout.
- Configure gadgets on the dashboard as needed, such as adding filters or specific reports.
- Click “Save” to finalize the dashboard.
Process of handling tickets in Jira:
- Ticket creation: Tickets can be created manually by team members or automatically via email or integrations. Each ticket is logged as an issue in the designated Jira project.
- Ticket assignment: Once a ticket is created, it can be assigned to the appropriate team member or queue based on predefined rules or manually by a supervisor.
- Progress tracking: As work progresses, team members update the ticket’s status, communicate through comments, and attach relevant documents or links.
- Resolution and closure: Once the issue is resolved, the ticket is closed in the system. Closing a ticket typically involves a final review and a summary of the resolution.
By leveraging Jira as a ticketing tool, organizations can benefit from its robust tracking capabilities, customization options, and integrative potential, making it a powerful solution for managing a wide array of support and operational tasks. This adaptability ensures that Jira can meet the specific needs of various organizational processes, providing a comprehensive toolset for issue resolution and task management.
When should you prefer Jira?
Jira should be preferred when managing complex software development projects, especially those utilizing Agile methodologies. It’s particularly beneficial in environments where tasks need meticulous tracking and where team collaboration must be tightly integrated into the workflow. Jira excels in scenarios where customization of workflows and detailed reporting are required to meet specific project management needs.
For teams engaged in iterative development, such as those using Scrum or Kanban, Jira provides tools to manage backlogs, plan sprints, and track issues effectively. This support helps maintain the agility needed to adapt to changing project requirements and priorities, often necessary in fast-paced development settings.
Furthermore, organizations that rely heavily on integration with other tools—like CI/CD pipelines, code repositories, and testing tools—will find Jira’s extensive integration capabilities invaluable. This integration helps streamline the development process, making it smoother and more efficient.
However, smaller teams or projects with simpler workflows might find Jira’s robust features overwhelming and unnecessary. In such cases, simpler tools might be more appropriate and cost-effective. Thus, Jira should be preferred when its advanced features and integrations provide clear benefits over simpler project management tools, particularly in environments where the complexity of tasks requires detailed tracking and reporting capabilities.
What are the benefits of Jira ticketing system
- Customizability: Jira offers extensive customization options, allowing teams to tailor workflows, fields, and interfaces to fit their specific project needs and preferences. This flexibility is particularly beneficial in complex projects where standardized processes might not suffice.
- Integration: Jira seamlessly integrates with a wide array of tools that development teams commonly use, such as code repositories, continuous integration tools, and communication platforms. This integration helps streamline workflows, automate tasks, and centralize information.
- Agile Support: Jira is designed to support various Agile methodologies like Scrum and Kanban. It includes features such as backlogs, sprints, boards, and reports, which are essential for Agile planning and tracking. These features help teams manage their Agile projects more effectively.
- Enhanced Tracking: With Jira, every aspect of a project, including tasks, bugs, and enhancements, can be tracked meticulously. The system allows for detailed issue tracking, time estimations, and progress updates, ensuring that team members are always aware of priorities and deadlines.
- Reporting and Metrics: Jira provides powerful reporting tools and dashboards that offer insights into project status, team performance, and potential bottlenecks. These analytics help teams make informed decisions and continuously improve their processes.
What are the drawbacks of Jira ticketing system?
While Jira offers a robust set of features, it also has several drawbacks that organizations should consider before adopting it as their ticketing system
Managing high volumes of similar tickets
As organizations expand, they often receive a flood of similar issues or questions. For example, users may continually submit tickets about how to reset their password or how to use a specific feature. This can overwhelm support agents and lead to longer response times. Without proper processes in place to handle frequently asked questions, agents spend valuable time answering repetitive queries instead of focusing on more complex issues.
Prioritizing new ticket requests
When you first set up a ticketing system, handling tickets may seem simple—especially if there’s only one person managing them. However, as the number of requests grows, managing tickets by their order of arrival can lead to critical issues being ignored. For instance, if your team receives 50 tickets a day and five agents are each handling 10, a high-priority ticket submitted on day three might not be addressed for days. This can result in critical system issues, like bugs or outages, being delayed, potentially harming operations or customer satisfaction.
Limited customization of the customer portal
The customer portal is often the face of your support system. Jira’s default options for customizing this portal are quite limited, making it difficult to align the portal’s appearance with your company’s branding guidelines. This can lead to a disconnect in user experience, where the look and feel of the portal don’t match the rest of your company’s website or communication channels, leaving users with a less cohesive experience.
Complexity in setting up SLA policies
Service Level Agreements (SLAs) are crucial for setting expectations on how quickly issues should be addressed. However, configuring SLAs in Jira can be tricky, particularly if your organization has multiple SLA policies based on varying factors like priority levels, customer types, or issue categories. If SLAs aren’t properly configured from the start, it can lead to missed deadlines, angry customers, or confusion among support agents about response times.
Switch to Desk365 – Simple, Affordable, and Scalable Ticketing System
Limited mobile app functionality
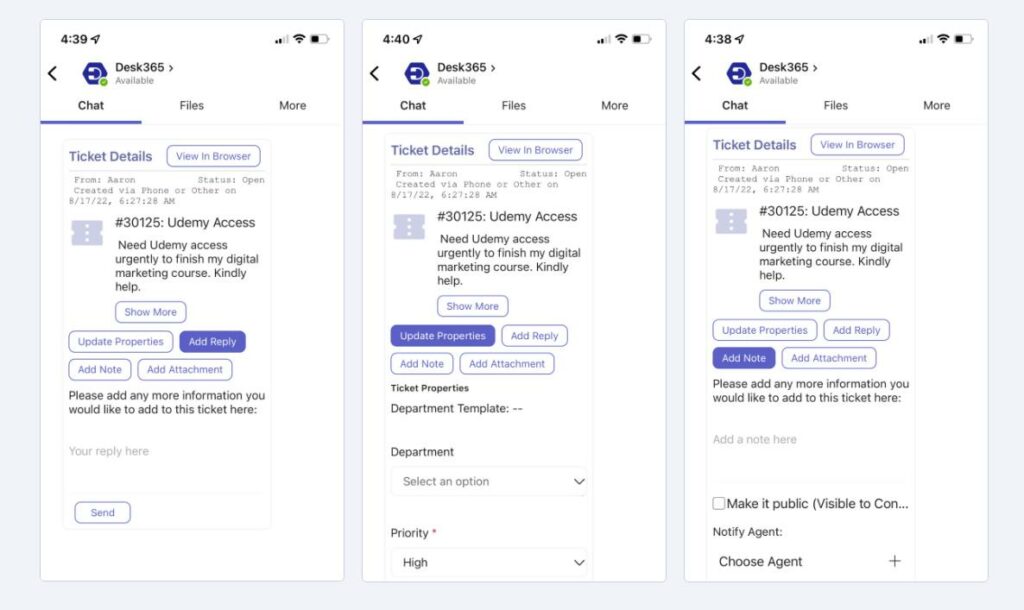
Jira’s mobile app allows agents to handle basic tasks, like viewing and commenting on tickets, but lacks the full functionality of the desktop version. Agents who need to manage tickets while away from their desks may be hindered by the app’s limitations, making it difficult to stay productive and responsive to critical issues in real-time.
Mobile helpdesks, such as Desk365, offer agents the invaluable flexibility to work from any location, making them an essential tool in today’s fast-paced business environment. When equipped with the appropriate features, a mobile helpdesk not only streamlines agents’ tasks but also enhances the overall user experience.
Cost considerations for scaling
As your organization grows, the cost of Jira licenses, plugins, and additional integrations can rise significantly. Jira pricing is tiered, meaning that as you add more users or require more advanced features, your costs can increase rapidly. For larger teams, particularly those requiring additional tools to extend Jira’s capabilities, this can place a financial strain on your organization.
Read more – 9 Free Ticketing Systems You can Trust in 2026
Why Desk365 is better than Jira ticketing system?
If you’re considering using Jira as your ticketing system, here are some drawbacks to keep in mind:
- Jira can offer a functional system but may lack certain essential features out of the box, requiring additional plugins or customization to meet specific needs.
- For organizations on a tight budget, Jira’s costs can escalate quickly as your team grows, especially when factoring in licensing fees and necessary plugins for advanced functionality.
- If you’re pressed for time or need a simpler setup, Jira’s complex configuration process could be a barrier. Setting up workflows, SLAs, and integrations often requires significant effort, making it less ideal if you’re looking for a quick, easy solution.
Opting for a ticketing system like Desk365 could save you time, offering a more streamlined deployment without the steep learning curve or extensive setup that Jira demands.
Desk365 integrates directly with Microsoft Teams and offers a comprehensive set of features starting at $12. This can be a cost-effective solution that simplifies your ticketing system without the complications associated with Jira.
Ticket Management
- Custom Ticket Views
- Customer Management
- Responsive Mobile Web Apps
- Multiple Emails
- Multiple Groups/Departments
- Draft with AI
- Collision Detection
- Time Tracking
- 'Watchers' of Tickets
Workflow Automation
- Automation Rules
- Automated Ticket Assignment
- SLA Management & Business Hours
- SLA Reminders & Escalations
- Multiple SLAs
- SLAs in Automations
- Canned Responses
- Tasks/To-do Lists
- Closure Rules
Customization
- Custom Domain
- Custom Email Servers
- Custom Ticket Fields
- Custom Forms
- Custom Roles
- Custom Reports & Graphs
- Custom Response Templates
- Custom Knowledge Base
Integrations
- Entra ID Single Sign-on
- API Access
- Web-hooks
- Power Automate Connector
- Microsoft 365 Copilot Plugin
Omni-Channel
- Microsoft Teams Ticketing
- Email Ticketing
- Customer Support Portal
- Web Form/Web Widget
- Unified Inbox
Data & Analytics
- Customer Surveys & Reports
- Ticket Trend Reports
- Productivity/SLA Reports
- Import / Export Data
Support
- Free Setup and Installation
- Priority Support
We also offer a Free Plan with a limited set of features for hobby projects and testing purposes. Limited to 3 agents and 50 tickets per month.
No credit card info needed
Frequently asked questions
The Jira ticketing system offers a free plan for small teams of up to 10 users, which includes basic features like issue tracking, Scrum/Kanban boards, and limited storage (1 GB). However, it has restrictions on advanced features like automation, permissions, and reporting.
For larger teams, the Standard plan costs $7.75 per user/month and offers unlimited users, advanced reporting, custom workflows, and more automation options. The Premium plan costs $15.25 per user/month and includes features like advanced permissions, roadmaps, increased storage, and 24/7 support.
To create a ticketing system in Jira, start by signing up and creating a project. Choose a template (e.g., Scrum, Kanban, or Bug Tracking) based on your needs. Then, set up issue types (e.g., Task, Bug, Story) and define a workflow to track how tickets move through stages like “To Do,” “In Progress,” and “Done.” You can customize the fields for each ticket and set permissions for who can create or edit them.


